
Greg's Tool Cabinet #2
![]()
![]()
![]()
![]()
![]()
![]()
This is a combined tool and storage cabinet that I designed and made for my son Greg. The step by step construction photos and comments are below. Construction started on 10-21-08.
Country
Woodcrafts
|
Cabinet Design, Drawing and Rendering |
|
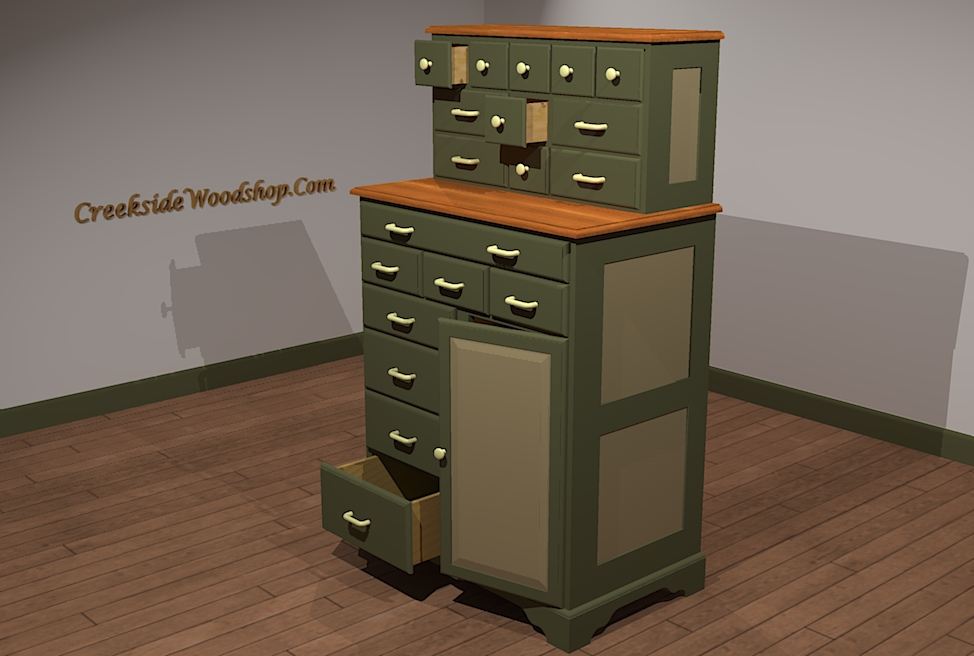 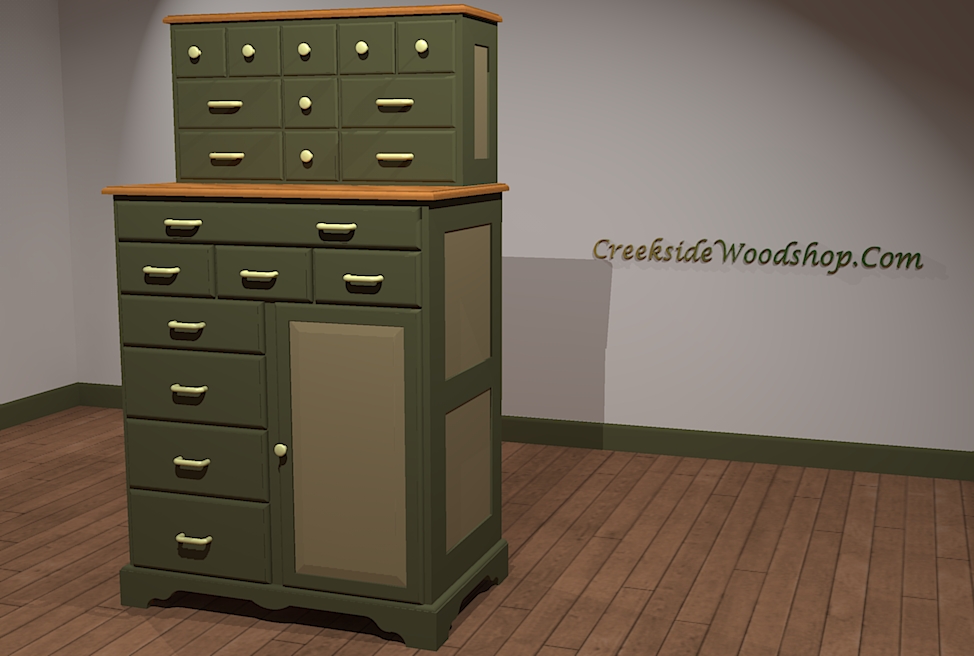  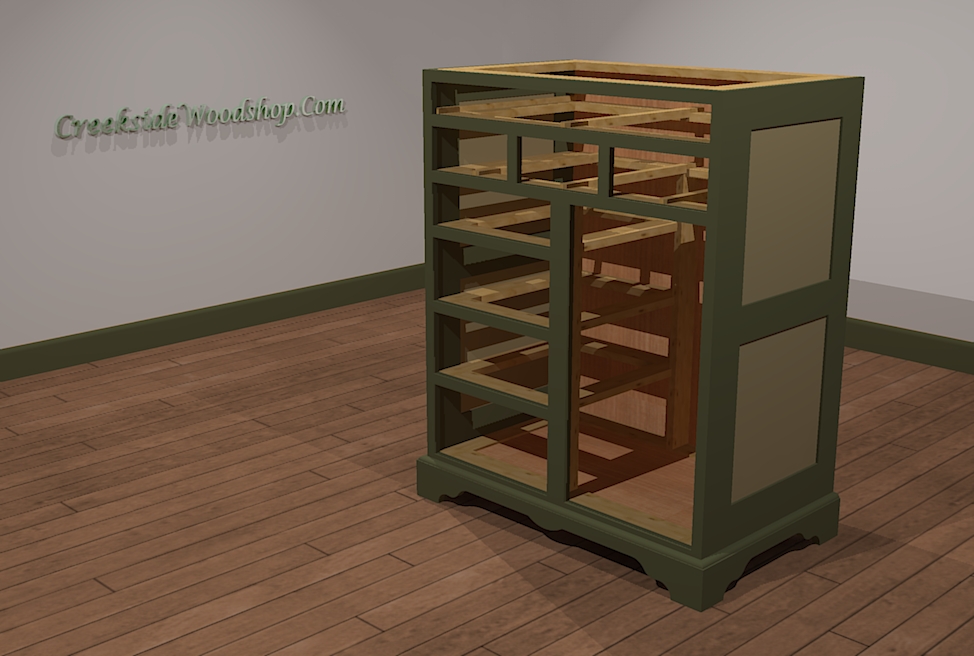  |
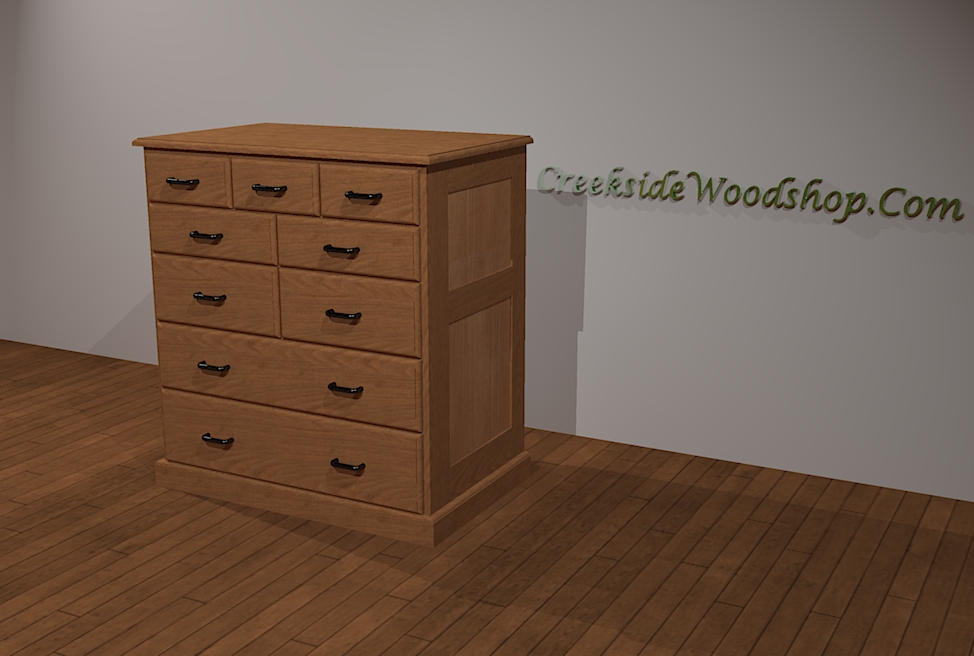
The Concept & Design: This is the second tool cabinet that I made for my son's new woodshop. It was an idea that I had that started with a base cabinet of drawers (see base cabinet below) and then slowly evolved into a cabinet on a cabinet. The door and internal drawers were added in the final design phase.
The SketchUp Model: The drawing for the cabinet was done in SketchUp and is HERE. All of my project drawings are done in SketchUp now instead of 2D CAD. The final design and ultimately the end product is better when it is first designed and "built" in SketchUp. All of the cabinet components within the SketchUp model are as they would be if made from wood. The SketchUp model can also be 'exploded' into component view for measurement and detail analysis.
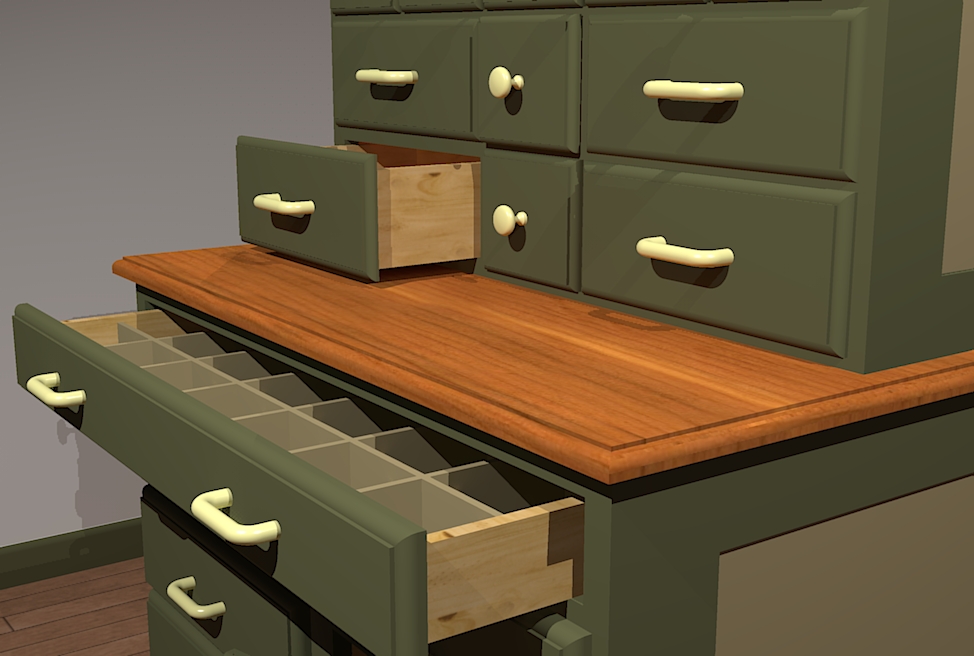
The Rendered Drawing: The photos at left are views from the SketchUp drawing that were exported and rendered in Kerkythea. |
 |
My original base cabinet is shown at left and only contained drawers. The upper cabinet of drawers was not in the concept at this time. The SketchUp drawing for this cabinet is HERE. |
|
Step-1 - Assembling the Cabinet Sides (Total Cumulative Project Time = 5.5 hrs.) |
|
.JPG) |
A stack of Pine lumber awaits for the saw. This accounts for about 75% of the needed lumber. Two sheets of plywood for the drawers and panels were also purchased. |
.JPG) .JPG) .JPG) |
The first step - cut the stiles and rails for the sides, cut the groves for the panels and dados for the internal framing. The Stiles and Rails are joined using a 1/2" Tenon that is set in the groove. The side frames are shown on the workbench in glue up. |
|
Step-2 - Build the Internal Framing (Total Cumulative Project Time = 9.0 hrs.) |
|
.JPG) |
Now that the sides are done I can move on to cutting the internal framing. All pieces are cut to size and length. |
.JPG) .JPG) |
I'm using half laps to join and construct the frames. The lower frames require a grove for the bottom dust panel and two others need a dado for the center vertical frame. |
.JPG) |
The frames are glued, squared and a couple of nails are added at each joint to hold them until the glue dries. |
.JPG) |
The completed frames. |
|
Step-3 - Assembling the Cabinet Shell (Total Cumulative Project Time = 14.25 hrs.) |
|
.JPG) |
Here I'm starting to glue the internal frames to one of the sides. I have also added a couple of diagonal nails to hold the frames in place while the glue dries. |
.JPG) |
The main framing is glued and clamps attached to wait for the glue to dry. |
.JPG) |
The cabinet is put on its side and the two vertical posts and smaller drawer frames are now glued and clamped. I have also added a few nails to keep everything in place until the glue sets up. |
.JPG) |
After the glue has setup I began cutting and attaching the face frames with glue and a few brad nails. |
.JPG) |
The final face frames are glued and in clamp up. |
|
Step-4 - Adding the Base Skirt (Total Cumulative Project Time = 17.75 hrs.) |
|
.JPG) .JPG) |
The 4" base is cut to size and the scroll work is cut on the bandsaw then taken to the drum sander for cleanup. |
.JPG) |
The base pieces are put on the router table and a decorative molding edge is added along the top edge. |
.JPG) .JPG) |
These final photos show the base being glued and nailed to the cabinet. I also added support blocks along the inside to each corner and the back for added strength. |
.JPG) |
The cabinet shell is now ready for the drawer and door construction. |
|
Step-5 - The Lower Drawers (Total Cumulative Project Time = 22.75 hrs.) |
|
.JPG) .JPG) .JPG) .JPG) |
The 4 lower drawers were made first. The length and width of the drawers are the same but were made in 3 different heights, (7", 6" & 4"). All of the sides, fronts, and backs were cut at one time. The photos at the left show the various stages of construction. |
.JPG) .JPG) .JPG) .JPG) |
The 4 lower drawers now get fitted with European Drawer Slides with 3/4 extension. These slides are installed on the bottom of the drawer. The drawers are installed and fitted without their final drawer faces which will be cut and routed later. The photos at left show the installation of the drawer slides. |
|
Step-6 - The Mid Drawers (Total Cumulative Project Time = 26.75 hrs.) |
|
.JPG) .JPG) .JPG) .JPG) |
The 3 center drawers (approximately 4" x 9.25") are constructed using the same method as described above. The drawer slides/guides are made using 2 guides attached to the drawer bottom and a single guide attached to the cabinet. I also installed drawer runners to provide additional drawer support. The photos at left show the installation of the drawer guides. The drawers are installed and fitted without their final drawer faces which will be cut and routed later. |
|
Step-7 - The Upper Drawer (Total Cumulative Project Time = 30.75 hrs.) |
|
.JPG) .JPG) .JPG) .JPG) .JPG) |
The large upper drawer is constructed using the same method as the other drawers. The first 2 photos show the use of one center guide. The drawer was divided into several compartments which can be changed to accommodate different sizes. The drawer faces are now ready to be cut and added. |
|
Step-8 - The Inner Drawers (Total Cumulative Project Time = 35 hrs.) |
|
.JPG) .JPG) .JPG) .JPG) |
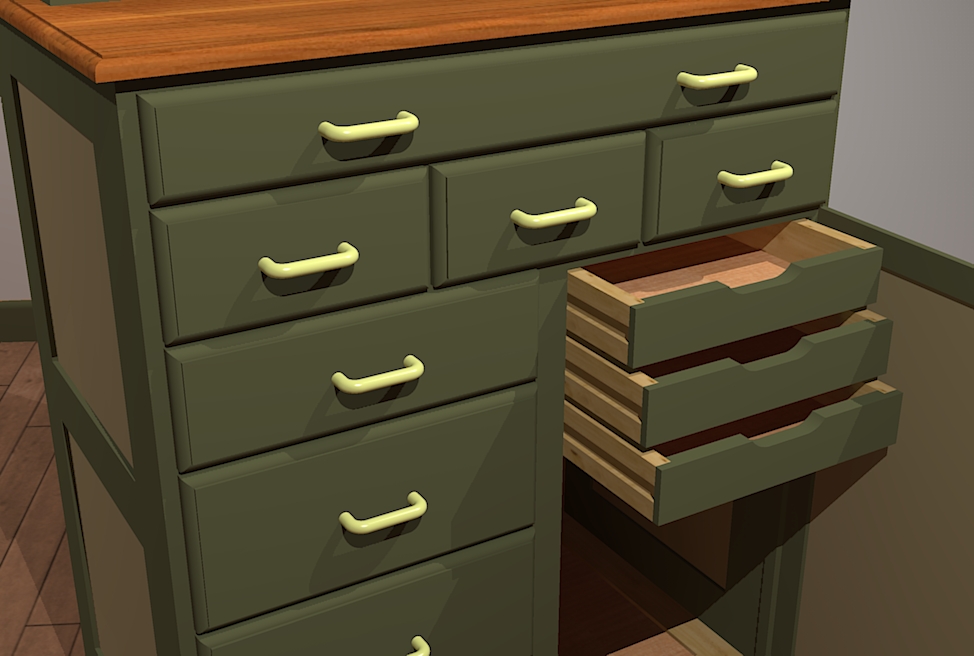
These photos show the construction of the 3 inner drawers which will be behind the cabinet door. The drawers will use side guides, a dado in the side of the drawer and Oak runners attached to the cabinet. |
.JPG) .JPG) |
These 2 photos show the finished and installed drawers. The drawers are slightly recessed to allow for the addition of the cabinet door. |
|
Step-9 - Cabinet Door & Drawer Faces (Total Cumulative Project Time = 44.25 hrs.) |
|
.JPG) .JPG) .JPG) .JPG) |
The door is made form 3/4" pine and a 1/4 panel. The stiles and rails are tong & grooved. The door edges are rounded over with a round over beading bit. I used spring loaded hinges that are mortised into the back of the door. |
.JPG) .JPG) .JPG) .JPG) |
This series of photos show the drawer faces being installed. Like the door, I used a round over beading bit on all the edges. I attached the faces by 1st aligning and clamping them in place, then putting a couple of brad nails through the back to hold the drawer face in place. I was then able to remove the drawer and finish the attachment with a couple of wood screws through the back then adding the drawer pull. |
|
Step-10 - The Top (Total Cumulative Project Time = 46.5 hrs.) |
|
.JPG) .JPG) .JPG) .JPG) |
The top was made from two 12" boards. The two boards were run through the planer to make sure that they were at an even thickness then glued and joined together with #20 biscuits. The top was then sanded and a round over beading was applied on the front and side edges. I secured the top to the base using woodscrews from with in the cabinet. |
.JPG) |
With some final sanding and the addition of the back panel the base cabinet is now complete. |
|
The Upper Cabinet |
|
.jpg) .jpg) |
The construction process and joinery techniques for the upper cabinet will be the same as used on the lower cabinet. The cabinet drawers are uniform in height and width which should cause the build process to go much faster. |
|
Step-11 - Cabinet Sides & Internal Framing (Total Cumulative Project Time = 51 hrs.) |
|
.JPG) .JPG) .JPG) |
The Stiles and Rails for the sides as well as the internal framing are cut at one time. The groves in the Stiles and Rails as well as the framing and cross members are also cut at the same time. The Stiles and Rails are joined using a 1/2" Tenon that is set into the groove. The side frames are shown on the workbench in glue up. |
.JPG) .JPG) |
The 1st photo shows the glue up of the internal framing. The photo also shows the cross members which will be used for drawer runners. The 2nd photo shows the completed sides and internal framing ready for assembly of the cabinet shell. |
|
Step-12 - Assembling the Cabinet Shell (Total Cumulative Project Time = 55 hrs.) |
|
.JPG) .JPG) |
The internal framing is glued and set into dados in the side pieces and a few brad nails are cross nailed from the inside. Clamps are used until the glue dries. The 2nd photo shows the final addition of the face frames. The cabinet shell is ready for the drawers. |
|
Step-13 - Building the Drawers (Total Cumulative Project Time = 68 hrs.) |
|
.JPG) .JPG) .JPG) |
All of the drawer pieces are cut at one time. There are 11 drawers in 2 different sizes. The pieces that are stacked on the workbench are the fronts and sides that are ready for assembly. |
.JPG) .JPG) |
The 1st photo shows the drawer sides being glued and nailed to the drawer front while the 2nd photo shows the completed drawer. |
.JPG) .JPG) .JPG) |
All of the drawers use bottom drawer guides. Two guides are glued and nailed to the bottom of the drawer and the runner is nailed to the internal frame once the drawer is aligned. The final photo shows the completed drawers just prior to receiving an edge round over. |
.JPG) .JPG) .JPG) |
The final step is to round over the drawer edges on the router table and give them a good sanding. The drawer pulls are then added and the back panel to the upper cabinet is cut and attached. The last photo shows the upper cabinet attached to the lower cabinet and ready for the top. |
|
Step-14 - Building the Top (Total Cumulative Project Time = 70 hrs.) |
|
.JPG) .JPG) .JPG) .JPG) |
I made the top from two boards that were run through the planer to make sure that they were at an even thickness. They were then glued and joined together with #20 biscuits. I ran the top through the planer again to even it out and gave both sides a good sanding. A round over beading was applied on the front and side edges. The top is secured to the case using woodscrews from with in the cabinet. |
|
Step-15 - Ready for Delivery and Finish |
|
.JPG) .JPG) .JPG) |
As a final step, I added two metal brackets to the back to hold the upper cabinet to the lower cabinet. The cabinet is ready for delivery to my son Greg's where he will take over the finishing steps. |